User Tools

Site Tools


en:poimanager

Documentation of the POI Manager

Graphical user interface

Overview

The graphical user interface of the POI Manager can logically be subdivided in a map and list section. The map allows browsing, visualizing, editing and selecting existing POIs or visualizing additional base map raster layer like aerial image, topographic or basic maps as well as a point layer containing street addresses.

The second section contains the non geographical representation of the POIs in form of lists. Lists allow enabling to look for single POIs by name based filtering or sorting functions.

The map view and list view are interactive based on the fact that the selection of a POI in the map leads to the selection of the corresponding entry in the listed view of the collection.

Description of the graphical user interface

  1. Search bar allows searching for places, localities, municipalities or coordinates
  2. Spatial coordinates bar allows defining the type of spatial references as well as reading the coordinates of the mouse cursor
  3. Activate or deactivate the list of available additional layers
  4. Login or logout button to create or terminate a user session
  5. Activate or deactivate the overview map
  6. Non geographical view of the available collections (see following sub chapters)
  7. Dynamic scale bar
  8. Map navigation bar allows zooming in and out, panning vertical or horizontal and zooming out to the initial extent of the country

Map

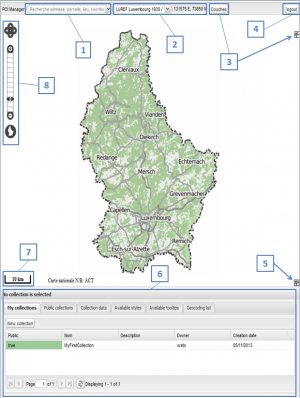
The map section allows browsing, visualizing, editing and selecting existing POIs or visualizing additional base map raster layer like aerial image, topographic or basic maps as well as a point layer containing street addresses. A detailed description of the map navigation can be found here. Next to the manual navigation the map supports searching by localities, coordinates or places, a detailed description to the search bar can be found here.

Changing the base (background) map

Generally the map contains a base map layer and the POIs of a selected collection, the base map should give additional support for orientation on the map. Several types of base maps can be displayed by selecting the accordingly layer at the table of layers available the “couches” button or the double arrowed button on the upper right corner of the map. (see point 3 of the GUI description). This table of layers contains next to the current available aerial image, the topographical map, a simplified base map and point layer representing the street address. The selected layer will be displayed by checking the accordingly check box next to the desired layer description.

Overview map

On the lower right corner of the map you can find a second double arrowed button allowing to show or hide a small interactive overview map (see point 5 of the GUI description). The extent of the current map windows is represented by a red square, as both windows are interactively connected the extent on the overview map will change when the main map extent is changed and vice versa.

Context menu

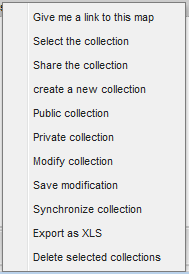
The context menu of the map can be opened by clicking the right mouse button anywhere on the map. The context menu includes the following three options:

  • Find in the list - Shows the appropriated entry in the selected collection (Note: Returns no entry if no POI was clicked)
  • Create a POI here - Opens the “Create new POI” dialog with the coordinates of the clicked point on the map
  • Associate this position with the selected file - Set the clicked point on the map as the new point for the currently selected entry of the collection. This step is equal to editing a point manually, you will change the old geometry to a new one. (Note: For persistent changes you need to save your changes by hitting the Save button on the upper left corner of the “Collection data” toolbar)

Note: If no collection is selected at the “My collection” tab at the listed view section all buttons of the map context menu are disabled. You have to select a collection first to enable the collection related functions. The current selected collection can be check at the label Active collection: located on the left side of the bar separating the map from the list section.

Collections

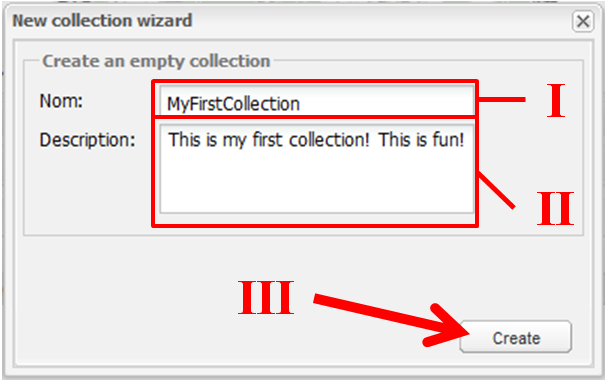
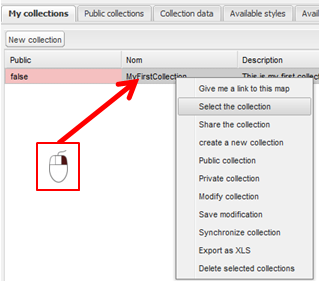
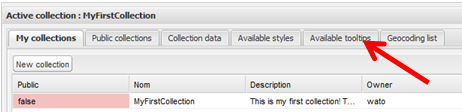
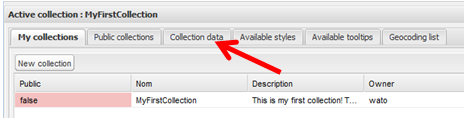
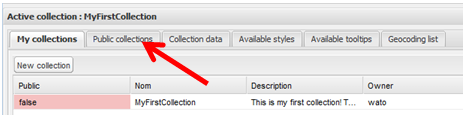
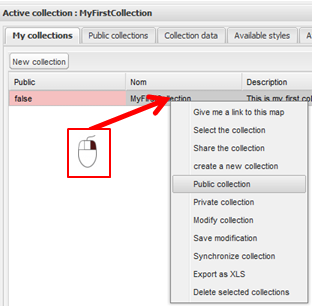
A collection is a set of POIs created by users or accumulated by including public collections into a new one. Visually each collection is one list of POIs. All collections are managed in the lower part of the application. The management of collections is organized in tabs including the following tabs:

  • My collections - Allows managing all collections that I have created or shared with friends
  • Public collections - List of collection that are accessible for the public
  • Collection data - Listing the currently selected collection
  • Available styles - Defining symbols for visualizing my POIs
  • Available tool tips - Defining pop up windows for my POIs
  • Geocoding list - Monitoring the geocoding processes

My Collection

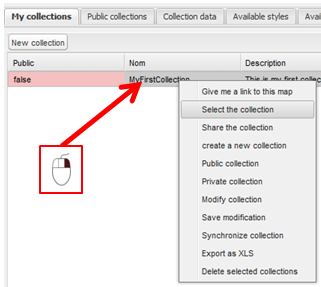
All collections that I can access are listed in this tab. Collections are visible to me if I am the creator of it or if a friend shares a collection with me. The tab menu bar includes only one New collection button allowing me to create new empty collections. The listing section contains 5 columns displaying attribute values for each collection. The listing navigation bar is located at the bottom of the page, it facilitates to navigate trough the pages of a list. Collections comprehend 5 attributes including :

  • Public - Parameter that indicates if a collection is available for the public
  • Nom - Name of the collection
  • Description - Field intended for plain text describing the collection
  • Owner - Username of the creator of the collection
  • Creation date - Creation date of the collection

Context menu

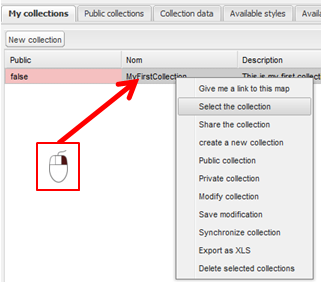
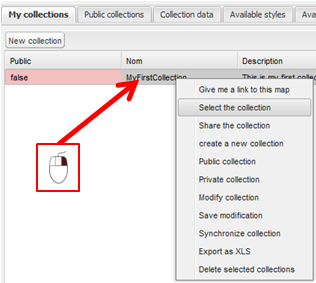
The context menu of a collection can be opened by a right mouse click on the collection entry. It contains all options that are available for those collection.

  • Give me a link to this map - Opens a map view element in a new window showing all POIs included at the selected collection. To embed this map into an external web site the user only needs to copy the link at the address bar and include it at its own web site
  • Select the collection - This button selects the collection represented by the current selected line in the list so that the POIs are visualized at the map (Note: The currently selected collection is permanently labeled at the Active collection label in the bar between the map and the section containing the collection list)
  • Share the collection - Initializes the process of sharing collections with friends. The dialog that pops up allows you to select the desired friends (see Tutorial for more information)
  • Create a new collection - Creates a new collection, equal to the New collection button at the tab toolbar at the upper left corner of the tab
  • Public collection - Declares this collection as accessible to the public (Note: current state can be checked at the first column Public)
  • Private collection - Declares this collection as accessible only by me or my shared friends
  • Modify collection - Edit the initial parameters set at the moment of creation (including name and description of the collection)
  • Save modification - Changes of collection properties are only persistent after you saved them by hitting this button (Note: Unsaved modification are illustrated with a red flag at the upper left corner of the accordingly attribute field)
  • Synchronize collection - If the collection contains part of a public collection this button leads to the synchronization (update) of those imported POIs (Attention: If you edited POIs that are part of a public collection yourself, those changes will be lost by overriding with the current public version of those POIs)
  • Export as XLS: Initializes the download process of the selected collection as Microsoft Office Excel 97-2003 (.xls) file format
  • Delete selected collections: Deletes the selected collection, you will get ask to confirm the deletion

Public collection

All collection that are accessible to the public are listed in this tab. Own collections can be shared with the public by using the Share this collection button at the My collections tab (see section My collection for further information). Public collections comprehend 5 attributes including :

  • Public - Parameter that indicates if a collection is available for the public
  • Nom - Name of the collection
  • Description - Field intended for plain text describing the collection
  • Owner - Username of the creator of the collection
  • Creation date - Creation date of the collection

Context menu

The context menu of a public collection can be opened by a right mouse click on the collection entry. It contains all options that are available for those collection.

  • Select the collection - This button selects the collection represented by the current selected line in the list so that the POIs are visualized at the map (Note: The currently selected collection is permanently labeled at the Active collection label in the bar between the map and the section containing the collection list)
  • Give me a link to this map - Opens a map view element in a new window showing all POIs included at the selected collection. To embed this map into an external web site the user only needs to copy the link at the address bar and include it at its own web site
  • Import this collection into mine - Initializes the import process to include the public collection to one of mine collection. The pop up dialog includes a combo box menu allowing to select one of mine existing collection in which the POIs of the public collection should be imported. (Note: If you want to create a new collection containing only the POIs of the public collection, you need to create a empty collection first)

Collection data

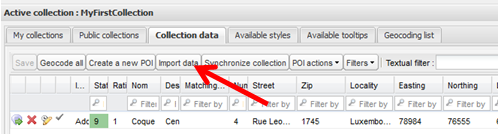
All POIs that are in the currently selected collection are listed in this tab. It includes several option as well as a text filter search function. The listing section contains 19 columns displaying attribute values for each POI. If you want to scroll through POI entries you can use the browsing toolbar located at the bottom of the page. Each column is headed with a filter field allowing to filter the entire collection by the appropriate field. The listing section contains the following 19 columns:

  • - Geocodes the appropriated POI
  • - Deletes the appropriated POI
  • - Starts editing the appropriated POI
  • - Set the verified flag of the appropriated POI
  • Image - Image attached to the POI
  • Status - Classification of geocoding result (10 = manually verified, 9-6 good - satisfying), < 6 bad to no result)
  • Ratio - Auto-Evaluated ratio of the geocoding result (1= maximal similarity between matching and input address, 0 = very low similarity)
  • Nom - Name of the POI
  • Description - Plain text description of the POI
  • Matching address - Address assigned by the geocoding process
  • Number - House number of the appropriated POI
  • Street - Street name of the appropriated POI
  • Zip - Postal Code of the appropriated POI
  • Locality - Name of the Locality of the appropriated POI
  • Easting - Horizontal coordinate of the appropriated POI
  • Northing - Vertical coordinate of the appropriated POI
  • Lon - WGS84 Longitude coordinate of the appropriated POI
  • Lat - WGS84 Latitude coordinate of the appropriated POI
  • Type - Type of POI (Hotel, Restaurant, monument, etc. )

Toolbar menu

The toolbar of the collection data tab is located between the tab selection bar and the listing section. The toolbar contains five buttons, two sub menu buttons, one textual filter bar and one check box to switch between editing and none editing mode. Some toolbar elements maybe disabled depending on your current selected collection or if there are unsaved changes. The toolbar of the collection data includes the following functions:

  • Save - Save all POIs persistently (Note: unsaved changes of POIs are marked with a red upper right corner)
  • Geocode all - (Re-)Launches the geocoding process for all POIs comprehended in this collection
  • Import data - Opens the dialog for importing POIs from Excel file formatted lists.
  • Synchronize collection - Launches the synchronization process that updates all imported POIs (Note: Successively edited POIs from public collections will be overwritten, you will get ask to confirm this action)
  • POI actions - Opens a sub menu containing all available actions for the currently selected POI. (see context menu of POI entries)
  • Filters - Apply filters on the list of POIs (Choose between show all POIs, show only non-geocoded POIs or show only POIs with bad auto-evaluated results)
  • Textual Filter - Filters the entire collection by searching the names for the entered text or characters
  • Edit mode - Check box for switching between editing and none editing mode (Note: Single POI can be changed without enabling editing mode)

Context menu of POI entries

The context menu of POIs can be opened by hitting the right mouse button on a POI line or by using the POI actions button. The following options are available at the context menu:

  • Edit the line - Launches the editing mode for this single line. You can change the position of the POI manually be click and drag the POI to the new position on the map. To save your changes persistently you need to save your POIs after you finished editing. (Note: Attribute values like name or description, … are editable at all time by double clicking the appropriate field at the listing sections)
  • Center on the map - Changes the extent of the map so that the POI is located at the center
  • Give me a link to this point - Opens a new browser tab including a map view element showing only the selected POI. (Note: To get a map element showing the entire collection you need to use the Give me link to the map function at the My collection tab)
  • Flag as verified - Marks the selected POI as manually verified resulting with auto-evaluating Status “10”
  • Delete selected lines - Deletes the selected POI
  • Geocode the selected lines - Launches the geocoding process for the selected line
  • Edit the position - Starts the editing mode for the selected POI (Note: If you want to save your changes persistently, you need to save you changes afterwords )
  • Add an image - Adding an image file to the POI (Note: The image can be shown at the tool tip of the POI by selecting the “image” variable at the POI value combo box)
  • Remove an image - Remove the image file associated with the POI
  • Import the selected lines into a collection - Opens the export dialog where you have to choose the destination collection

Available styles

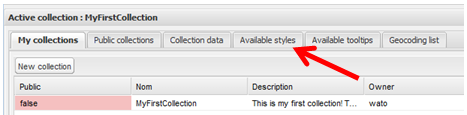
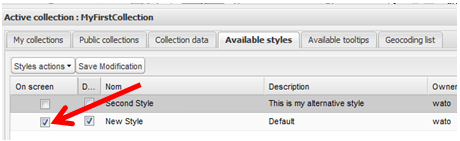
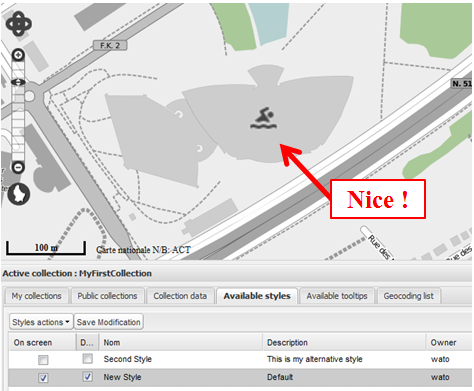
All available style for the selected collection are listed in this tab. The toolbar of the Available styles tab includes one sub menu and one button. The listing section contains five columns. The following attribute fields are defined for styles:

  • On screen - Check box to set the currently used style
  • Default - Check box to set the currently used default style
  • Nom - Name of the appropriate style
  • Description - Plain text description of the currently appropriated style
  • Owner - Username of the creator of the style

Note: Styles are connected to selections, this leads to the fact that styles cannot be accessed via other collections

Toolbar of the POI styles tab

The toolbar of Available styles tab is located between the tab bar and the list section. It contains one sub menu and one button. The following options are available at the toolbar:

  • Styles actions - Opens the context menu of the styles including all available options
  • Save Modification - You need to save your changes manually after editing the styles parameter at the listing section. You can edit the attribute values of the listing section by double clicking the appropriate field. (Note: Unsaved changes are marked with a upper left red corner of the attribute field )

Context menu of the POI styles

The context menu of the available style of a collection can be opened by hit the right mouse button or the Styles actions button at the toolbar. The context menu of a style includes the following two options:

  • New style - Opens a dialog allowing to define new style by indication name and description and format style parameters
  • Modify symbol - Opens the style parameter dialog where all parameters can be changed. After changing parameter you have to save your changes by hitting the Save Modification at the toolbar or the Save the symbol definition at the style dialog window.

Symbol definition dialog

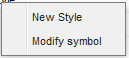
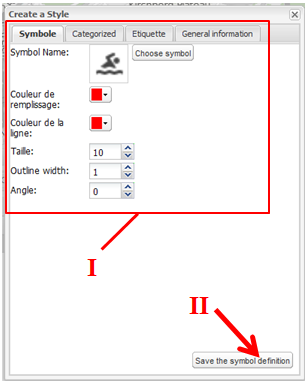
The symbol definition dialog can be accessed by hitting the Modify symbol button at the context menu of an existing style or by creating a new style with the New style button at the toolbar of the Available styles tab or the context menu of the listing section.

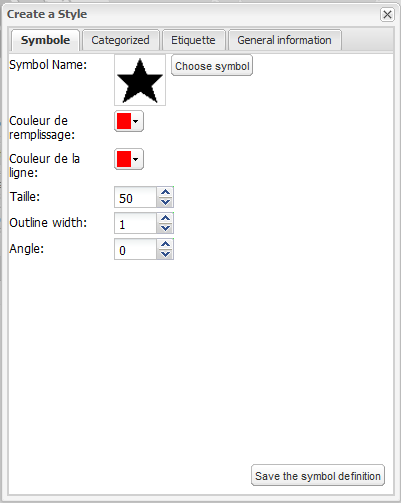
The dialog allows to define unique or categorized symbols as well as illustrating labels. For each task you find a specific tab at the dialog:

  • Symbol - Allows to define a unique symbol for all POIs
    • Symbol Name - Open the symbol chooser dialog by hitting the Choose symbol button. You can choose between PNG image files, predefined system symbols (mapserver symbols) or user symbols. To add a new user symbol you can choose the Add new user symbol at the left Symbol tree.
    • Couleur de remplissage - Fill color of the symbol (only needed in case of system symbols)
    • Couleur de la ligne - Color of symbol lines (only needed in case of system symbols)
    • Taille - Size of the symbol or image in Pixel
    • Outline width - Width of the symbol lines (only needed in case of system symbols)
    • Angle - Rotation of the image or symbol in degrees(°)
  • Categorized - Allows to evaluate classification rules to categorized your POIs. You can select a attribute field name the the first line of the tab. The listing section above the combo box menu shows you the available values for the selected attribute field. If you choose a system symbol you can hit Automatically fill to generate automatically a color ramp assigning each attribute value a unique color. Or you define manually for each category of POIs a specific symbol by selecting the desired symbol and define the symbol at the lower part of the tab (analogue to the uniqie symbol definition tab).
  • Etiquette - Allows to add a dynamic label to your POI
    • Label column - Define the attribute field name that includes the values you want to show (e.g. Name of POI)
    • Show Label - Check this box to show the label at the map
    • Max scale - Define a maximal scale to which your labels will be displayed. If the user choose a bigger scale the labels will not be visualized.
    • Couleur de remplissage - Fill color of the text
    • Couleur de la ligne - Outline color of the text
    • Size - Text size
    • Angle - Rotation of the text
    • Offset x, y - Horizontally (x) or vertically (y) offset of the text. Note: If x,y offset are 0, the label will placed at the upper left of symbol. Moving rules: (negative values are allowed)
      • To the right → increase the x value
      • To the left → decrease the x value
      • Up → increase the y value
      • Down → decrease the y value
  • General information - Set or change general information about the style like name or description. Note: You entered this properties at the first dialog when you create a new style

Available tool tips

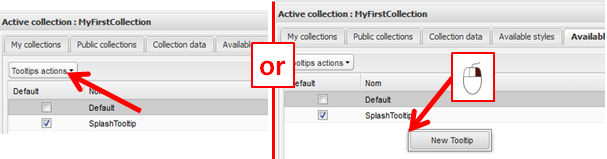
Tool tips are the small windows including additional information that pops up when users click on a POI. All available tool tips are listed at the Available tooltips tab. This tab is very similar to the Available style tab and includes a toolbar with a sub menu button and a listing section comprehending two columns. The following attribute fields are available:

  • Default - Check box that allows setting the tool tip of the selected collection
  • Nom - Name of the tool tip

Toolbar and context menu of POI tool tips

The toolbar of the tool tip tab contains only one single sub menu button that is including the context menu of the selected tool tip. The context menu contains two options:

  • New tooltip - Opens the new tool tip dialog allowing to define the name and the content of the tool tip
  • Modify tooltip - Opens the currently selected tool tip and allows to edit the content

Geocoding List

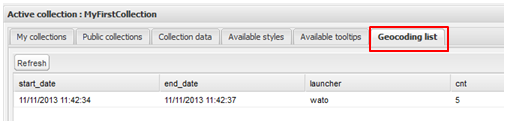
The history of all ongoing and completed geocoding processes is listed here. The Toolbar contains one button invoking a refreshment of the list. The listing section of this tab contains four columns:

  • start_date - Date and time when the geocoding process was launched
  • end_date - Date and time when the geocoding process was completed
  • launcher - Name of the user that started the process
  • cnt - Count of POIs that are/were geocode during the process

Tutorials

How to create a new collection

  1. Select the My collection tab
  2. Create a new collection by using the New collection button at the toolbar or by right clicking in the listing section
  3. Enter collection parameter
    1. Enter the name of your collection
    2. Enter a description of the collection
    3. Click Create
  4. After the successful creation of your new collection, a new line was added to your list of collections.

Note: The first attribute Public is set to false by default. This means that your collection is not public, only you can see it for the moment. Learn how to share your collection with friends or the public (here)

How to create manually new POI

  1. Select the desired collection at the My collection tab by the context menu (right mouse click) of the appropriate collection
  2. Change to the Collection data tab by double clicking the selected collection at the listing section of the My collection tab or by single clicking on the Collection data tab
  3. Open the context menu on the map at the location of the new POI and click the Create a POI here
  4. Enter additional Attribute fields like Name, Description, URL, etc. and click Create to save the new POI. Note: All geocoding related attribute fields are automatically generated by the geocoding process
  5. A new line is added at the listing section of the Collection data representing the new POI

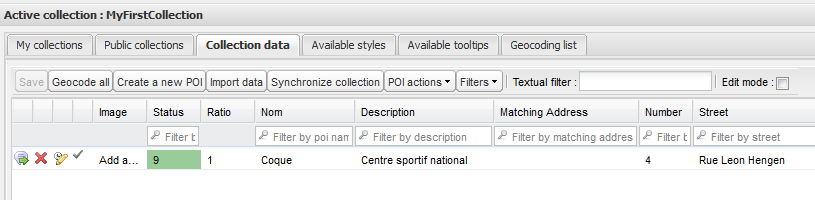
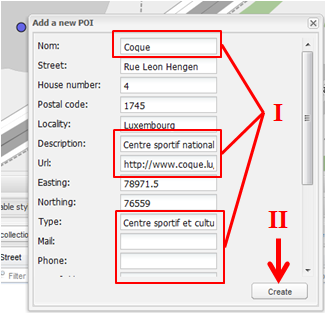
Note: To change a attribute value of a POI you can access the attribute window by clicking Edit this line at the context menu of the appropriate POI at the listing section

How to visualize my collection on the map

  1. To set or change the visualization of POIs you need to selected the appropriate collection first
  2. Change to the Available styles tab
  3. Create a new style by clicking Styles actions at the toolbar and New Style at the sub menu or edit an existing style by clicking Modifiy symbol at the context menu of a style at the list
  4. Define a unique symbol or categorized symbols and labels for the POI of the selected collection and click Save the symbol definition Note: You can only use only style for each collection. If you want to visualize different symbols for each POI or groups of POI you need to create a categorized symbol. (Hint: If you want to define single symbols for each POI you can categorize the symbols by their unique names). For detailed information please check the symbol definition dialog documentation (here)
  5. Close the symbol definition dialog by clicking the X at the top right of the dialog (Don't forget to save your definition by clicking Save the symbol definition)
  6. After the successful definition of the visualization of a collection you need to verify if the style is selected at the On screen attribute field at the listing section of the Available styles tab
  7. The visualization of your POIs is now set or changed and should be visible at the map

How to add a tool tip to my collection on the map

  1. Create or select a collection at the My collection
  2. Change to the Available tooltips tab
  3. Open the tool tip formatting dialog by creating a new tool tip by using the Tooltips actions or the context menu of the listing section or edit an existing tool tip by using the Modify tooltip function of the context menu of the specific tool tip
  4. Enter a name and the title of the tool tip. The name will only used to identify the tool tip definition. The title represents the title of tool tip which will be visible when the window pops up
  5. Define the (static) content of the tool tip at the Text field. 
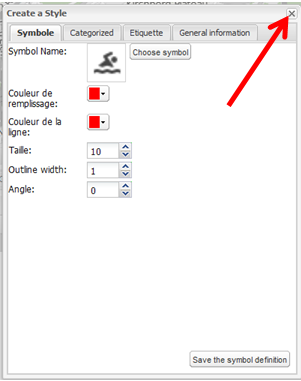
Note: You can only define one tool tip for each collection. If you want to show POI related values like names, address, URL, phone numbers, etc. you need to add placeholders
  6. Placeholders represent variables that are filled dynamically with the POI specific content (like names, addresses, user specific field values, etc). You can add those information by adding a placeholder represented by the name of the attribute field name. On the right of the text field toolbar you can find a combo box menu containing all attribute fields available at the current selected collection. By clicking on the desired attribute you add a ​${name_of_the_attribute} representation of the value in the text field, the specific POI value will be entered here dynamically at the moment when the user opens the POI. If you added images to your POIs you can add them here by using the image object at the list
  7. Click Create the tooltip when your finished and you want to save your settings
  8. Check if you have set the right check box at the Default column at the Available tooltips tab 
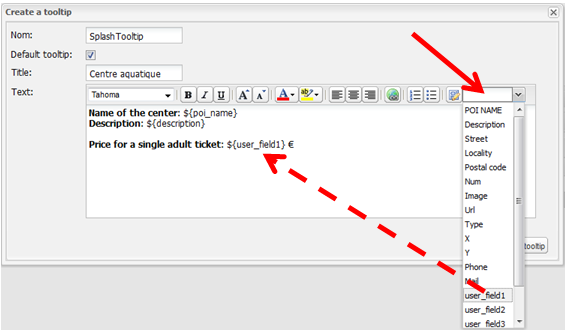
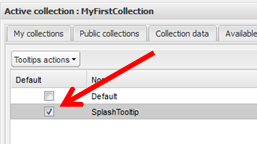
Note : You can only select one tool tip for each collection
  9. When you click now on one of your POIs the customized tool tip will pop up and show the additional information for your POI

How to import POI from my excel file

  1. To import POIs from a Excel file you need to create or select a collection to which the POI should be added
  2. Select the Collection data tab
  3. Open the import dialog by clicking on the Import data button
  4. By clicking on Select a File a File Upload dialog pops up, you can now browse to the folder with the Excel file and select it, by clicking on Open you set the path to the local file
  5. Click Next at the Import file dialog
  6. Now you have to indicate which column should be assigned to which attribute field. This can be done at the third column of the listing section by clicking on the empty field. Hint: You can change the size of the window by click & drag the edge of the window, then you can enlarge the column width by click & drag the separation line at the header of the columns
  7. Open the list with possible attribute assignments and select the appropriate value. At the address field you have to indicate the form how the address is structured and click Next. The following address structures are supported:
    1. All address attributes are stored in separated fields (assign the single values to appropriated fields)
    2. House number & street name are stored in one field
    3. Postal code & locality are stored in one field
    4. Entire Address is stored in one field
  8. Provide additional information by checking the boxes in matching cases
  9. If you checked the Geocode the address box you will get ask if you want to do this now. Click Yes if you want to launch geocoding now or No if want to start the process later manually. Successively you will get ask if you want to geocode the lines that have been manually move or verfied, click Yes
  10. Automatically the application will jump to the Geocoding list tab at which you can observe the process of your geocoding request. After the geocoding is completed you can verify your POIs at the Collection data tab
  11. The Status attribute at the listing section of the Collection data tab gives you information about the auto-evaluation of the geocoding result for each POI. The following status codes are possible:
    1. 10-9: Manually verification of the POI by the user (is considered as correct!!)
    2. 8: Good geocoding evaluation (Matching address identical to the geocode address)
    3. 7-6: Partial matching of addresses (strings of characters are identical)
    4. 5: Bad geocoding result
    5. 999: Error code. Geocoding was not possible (Hint: Maybe the needed address attributes weren't accessible)
  12. All POI are now visualized at the map, excepts the POI with the 999 status code. You can verified the POIs now manually and in case of mis-geocoding you can edit the POI manually by clicking Edit the position at the context menu of the appropriate POI at the listing section of the Collection data tab

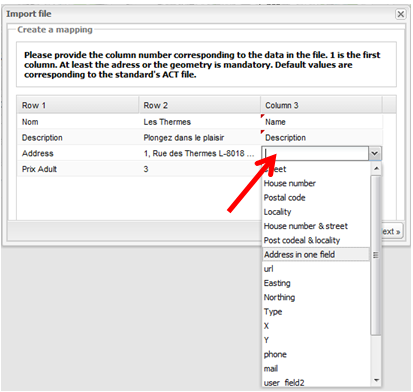
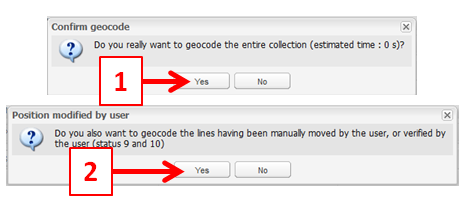
Note: Only complete addresses can be geocoded successfully. A complete address contains house number, street name and name of locality and optionally the postal code

How to import POI from a (public) collection

  1. Select the desired collection at the My collection tab by the context menu (right mouse click) of the appropriate collection
  2. Change to the Public collections tab
  3. Select a entire collection or select a single POI in a collection and choose Import this collection into mine respectively Import the selected lines into a collection to open the Import wizard
  4. Choose the destination collection from the combo box list at Existing collection and click Importer
  5. You can check now the destination collection and you will see that the POI are imported

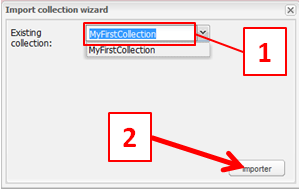
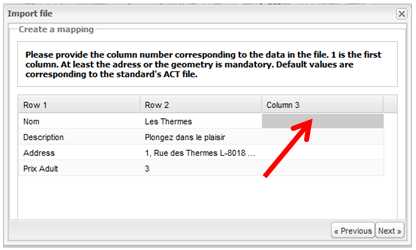
Note: You can import POIs not only by public collection but also from your own collection (copy from collection A to collection B) or from a collection shared with friends. The procedure is analogue

Note: Importing POIs means creating a copy, if you want to update your imported POIs later you have to hit the Synchronize collection button. Attention: This will override you current attribute values of the imported POIs

How to share my collection

  1. Select a collection at the My collection tab
  2. You can share your collection with the public or with your friend
    1. Share with the public
      1. Hit the Public collection button at the context menu of the collection you want to share Note: If you want to stop sharing your collection you can choose the Private collection option at the same context menu
    2. Share with friends
      1. Hit the Share collection button at the context menu of the collection you want to share, this will open the Rights for the collection dialog
      2. You can add or delete users with the toolbar located above the listing section of this dialog. To Add a new user hit the New user button, this leads to the attachment of a new line at the listing section
      3. Click the empty field in the Nom d'utilisateur to open the list of available users 
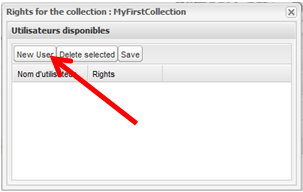
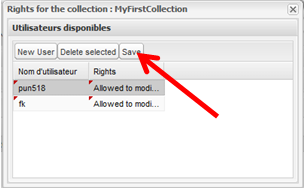
Note: You can search for users by typing the first letters of the username, the list will dynamically changing and showing only the corresponding users
      4. The red corners of at the listing section are showing that there are unsaved modifications, click Save to make those modifications persistent
      5. To close the window you can hit the X button in the upper right corner

How to include my collection on my web site

  1. Select the desired collection at the My collection tab
  2. The context menu of a collection or a single POI contains a Give me a link to this map respectively Give me a link to this point function
  3. A new browser window will open with a new map element showing the collection or the single POI
  4. If you want to include this map into your own website you can copy the source code of this new window into your own web site code
    1. At your <head> section, you need to include all <link> and <script> tags of the <head> section
    2. At your <body> section, you need to include the <div> and <script> tab of the <body> section

Testing of the poi Manager

Tab: My Collection

Create new collection

  • Create new collection by hitting the “new collection” button
  • Entering Name and Description of the new collection
  • Save attributes by hitting “create”
  • OBSERVATION: New empty collection is successfully created
  • FINAL STATE: Successful.
  • FINAL COMMENT: None.

Share my collection with friends

  • Open user selecting dialog by hitting the “Share the collection” button at the context menu of the collection entry
  • By the hitting the “New User” button a new entry can be created
  • Selected one user from the combo box in the user field
  • ERROR: Rights cannot be changed
  • Saving the new list of users by hitting “Save” button
  • Closing the dialog by hitting the “x” button
  • FINAL STATE: Collection is successfully shared with other users
  • FINAL COMMENT: Improvement of user experience possible by adding a search function for users as well as organizing user in groups leading to the possibility of sharing common project with professional or social groups

Share my collection with public

  • Using the “Private collection” or “Public collection” button on the context menu of a collection entry to set the publishing state
  • ERROR: The attribute in the “Public” field switch successfully between true (green) and false (red) but the public collection is not visible to me when I switch to the “Public collection” tab.
  • ERROR Button “give me a link” should be grayed out when collection is private.
  • FINAL STATE: Not successful.
  • FINAL COMMENT: None expects the error.

General observations

  • ERROR: hitting Give me a link to this map opens new window with the right geographical extent but no visible POIs.
  • SOLUTION: You need to select the collection first by selecting the entry and click on select the collection
  • ERROR: The selected POI symbol of a collection remains on the screen after a switch between two collections
  • ERROR: When I delete the selected collection the map has to be refreshed, otherwise the collection is still visible at the map till the map is refreshed by panning or zooming
  • COMMENT: The menu should either show “private collection” or “public collection” depending on the current collection state

Tab: Public collections

General observations

  • Selecting a collection works.
  • Getting the link of the map works.
  • Importing to one of mine collection works.
  • Synchronizing a public collection in one of mine collection works.

Tab: Collection data

Create POIs manually by address

  • Manual creation of a new POI by hitting the “Create a new POI” button.
  • OBSERVATION: Template pops up allowing entering attribute values like Description, Address, etc. The new point is created at the center of the current window extent. Attributes like coordinates and address values are dynamically inserted. To create a new POI I want to insert the address of this point and geocode it successively, this requires to delete the “none-sense” address of the new point created at the center of the window.
  • Input of the address of my new POI, as well as some additional attributes like URL, Description,…
  • Save values by hitting “create” button
  • POI is successfully created
  • Launching of the geocoding process by hitting “geocode this line”
  • OBSERVATION: Geocoding calculated successfully the missing coordinates.
  • FINAL STATE: Successful.
  • FINAL COMMENT: Improvement of intuitive user experience possible.

Create POI manually by placing it on map

  • Manual creation of a new POI by hitting the “Create a new POI” button
  • Manual positioning of the POI on the map to the location i want to create my POI
  • Entering additional attributes like name, desciption, …
  • Save values by hitting “create” button
  • POI is successfully created
  • Launching of the geocoding process by hitting “geocode this line”
  • OBSERVATION: Geocoding process added Matching address “Luxembourg”, zip “1745”, Locality “Luxembourg” but no street or house number attribute.
  • FINAL STATE: Not successful.
  • FINAL COMMENT: Reverse geocoding not completed.

Import new POIs defined in a EXCEL file

  • Creation of a dummy excel file
  • Create a new collection at the “MyCollection” tab
  • Import EXCEL file by “Import data” button
  • ERROR: Geocoding of the imported POIs failed. Error code 999 (Error occurred during geocoding). No detailed information.
  • OBSERVATION: All attribute values are empty. → No input for geocoding.
  • GUESS 1: Format of the EXCEL table was wrong.
  • TRY: Create manually a single POI without geocoding and export to xls-file to get the required format.
  • OBSERVATION: Problem not solved, same problem as previous try.
  • GUESS 2: XLS-file locked by excel. Reading of xls file not possible
  • TRY: Closing excel.
  • OBSERVATION: Problem not solved, same problem as previous try.
  • FINAL STATE: Not successful.

Editing a existing POI by activating "Edit mode"

  • Check “Edit mode” combo box
  • Selecting an entry in the collection data tab
  • Manually editing of the POI position on the map
  • ERROR: New position is not saved by the system.
  • GUESS: I miss the save entry button?
  • OBSERVATION: When i place the POI manually on the map, the coordinates are live updated (left upper corner marked red). When I select “Edit this line” afterwards at the context menu and hit the “Save” button successively the new coordinates are saved permanently (red corner are vanished).
  • NOTE: I discovered the “Save” button
  • Saving the new POI coordinates by hitting the “Save” button
  • FINAL STATE: Successful.
  • FINAL COMMENT: Improvement of intuitive user experience possible → placing the “Save” button next to the edit mode

Editing a existing POI without activating the "Edit mode"

  • Selecting an entry in the collection data tab
  • Hit “Edit the position” on the context menu of the selected entry
  • OBSERVATION: Symbol of the POI changes to blue point underlying by a yellow point.
  • Moving the blue point to the new position of the POI
  • Saving the new POI coordinates by hitting the “Save” button
  • FINAL STATE: Successful.
  • FINAL COMMENT: Improvement of intuitive user experience possible → placing the “Save” button next to the edit mode

General observations

  • ERROR: hitting POI actions → add image leads to no reaction. I guess the button hyperlink is not set.
  • ERROR: hitting POI actions → Give me a link to this point opens new window with the right geographical extent but no visible POI. Not reproducible.
  • QUESTION: Adding an image to an entry works but how can this image be used?
  • NOTE: Filtering works
  • NOTE: majority of “POI actions” works (see error add images, Give me a link to this point)
  • COMMENT: Horizontal sliding inside the table of entries would be nice. Auto adjusting columns widths leads to unreadable titles.
  • COMMENT: When I use the “Find in the list” function on the map context menu, the selected entry is shown successfully but how can i get back to the rest of the list? Sort of “clear selection” is missing.
  • ERROR: When I select a Attribute field name at the Import file dialog and go back by “previous” → return by “next” the selected attribute fields are no longer available at the list. I guess the list is loaded once at the initialization of the import dialog.
  • COMMENT: When a new POI is created manually by hitting the Create new poi button. The POI jumps to the middle of the window extent, a more intuitive approach would be a selector which the user can use to choose the possible of the POI

Tab: Available styles

Create new style

  • Creating new style by clicking the “New Style” button of the “Style actions” button or context menu of a style entry
  • Entering name and description
  • OBSERVATION: After hitting the “Create style” button a style dialog pops up
  • Selecting a single symbol for all POIs by defining the symbol at the “Symbol” tab
  • Saved and applied the style by hitting the “Save the symbol definition” button
  • Defined categories of symbols at the “Categorized” tab
  • Chose a attribute field containing the attribute that should be categorized
  • Defined a symbol for each category or select “automatically fill” or selected own image
  • Saved and applied the style by hitting the “Save the symbol definition” button
  • Set a label by selecting a attribute field at the “Etiquette” tab and checking the showing selecting box
  • Defined different maximal scales
  • FINAL STATE: Successful.
  • FINAL COMMENT:
    • Single symbols and categorized symbols shouldn't be on the same level as etiquette. I propose to put both types of symbology to one tab “symbol”.
    • “Automatically fill” is not self explaining.

General observations

  • ERROR: If I cancel the creation of a new style at the style definition dialog by hitting the “x” button, the new style undefined style remains with the default settings in the style list.
  • ERROR: Symbol definition dialog - SVG symbols looks similar to PNG excepts the name. But they are not shown at the map? Looks like the files would not exists.

Tab: Available tooltips

  • Creating a new tool tip by hitting the “New tooltip” button of the “tooltips actions”
  • Entering the name and title of the tool tip
  • COMMENT Title field supports only static input
  • Defining the body part of the tool tip with static and dynamic context, attribute values are inserted by a combobox menu filled with all attribute field names
  • Different formatting orders on static and dynamic text tested
  • FINAL_STATE: Successful.
  • FINAL_COMMENT: The workflow of changing styles or tooltips is very similar, i think it would be user friendly to implement the same way of editing and saving styles and tool tips. There is no “Save” button at the tool tip modification dialog, I guess thats because every time the entire tooltip is overwritten, but maybe you could use the same work pattern (edit and save or save every edit step) at both definitions (styles and tool tips)
  • ERROR Uploaded images cannot be shown in tooltip : internal server error (tried with GIF and PNG)

Tab: Geocoding list

  • NOTE: Nice to have.
  • ERROR: When the “geocoding list” is selected the features blinking in ca. 5 second interval (funny)
  • FINAL_STATE: Successful.
  • FINAL_COMMENT: Any additional purpose than geocoding process information?

Application

  • ERROR: When I change the spatial reference system to UTM or WGS84 the “Couches” button jumps horizontally depending on the coordinates numbers
  • NOTE: The current way of notification which collection is active doesn't fit with my brain. A lot of errors or confusions I ran in were based on the fact that I have selected the wrong collection
  • COMMENT: Selecting more than one raster layer makes no sense, if i select another base map I don't want to undone the selection of the previous one to actual see the new selection. A radio group solution would be better.
  • ERROR: Geocoding is not correct with an address containing year numbers. E.g. “1, place des sacrifies 1940-1945 L-4115 ESCH-SUR-ALZETTE” → 1940 recognized as ZIP
  • COMMENT Translations should be rechecked
  • COMMENT: Consider rearrangement for tabs. Collection tabs should be separated from Data, Style and tooltip tab.

Fiche "POI Manager"

  • Point 9: Select a POI from the list leads to select it automatically on the map. Selecting a POI from the map should result in selecting this item in the list and center at this item, this is not working or supported.
en/poimanager.txt · Last modified: 2018/02/27 09:34 (external edit)